Two months ago we shared our thoughts on the Trek Speed Concept and declared that if we were willing to race it, we would certainly buy it. Well last month we decided to put our money where our mouth is and we purchased a Speed Concept (in full Aerogeeks livery) to serve as a test bike and team Sherpa-mobile.
A few things happen whenever we add a new bike to our fleet. First, we decide which of our editors will be using this as their primary test bike. In this case, it was time for Mike, our Chief Editor, to trade in the Quintana Roo CD0.1 he had been using for the past few years. Next up is the addition of additional specific components. In the case of the Speed Concept, Mike traded in its original S-Bends for a pair of ski-tips. We’d also decided that the Speed Concept was going to be used to test a set of Zipp 808 wheels, so that was a part of the initial build process as well. A Bontrager DuoTrap integrated speed and cadence sensor was added, and finally, we installed Mike’s preferred saddle.

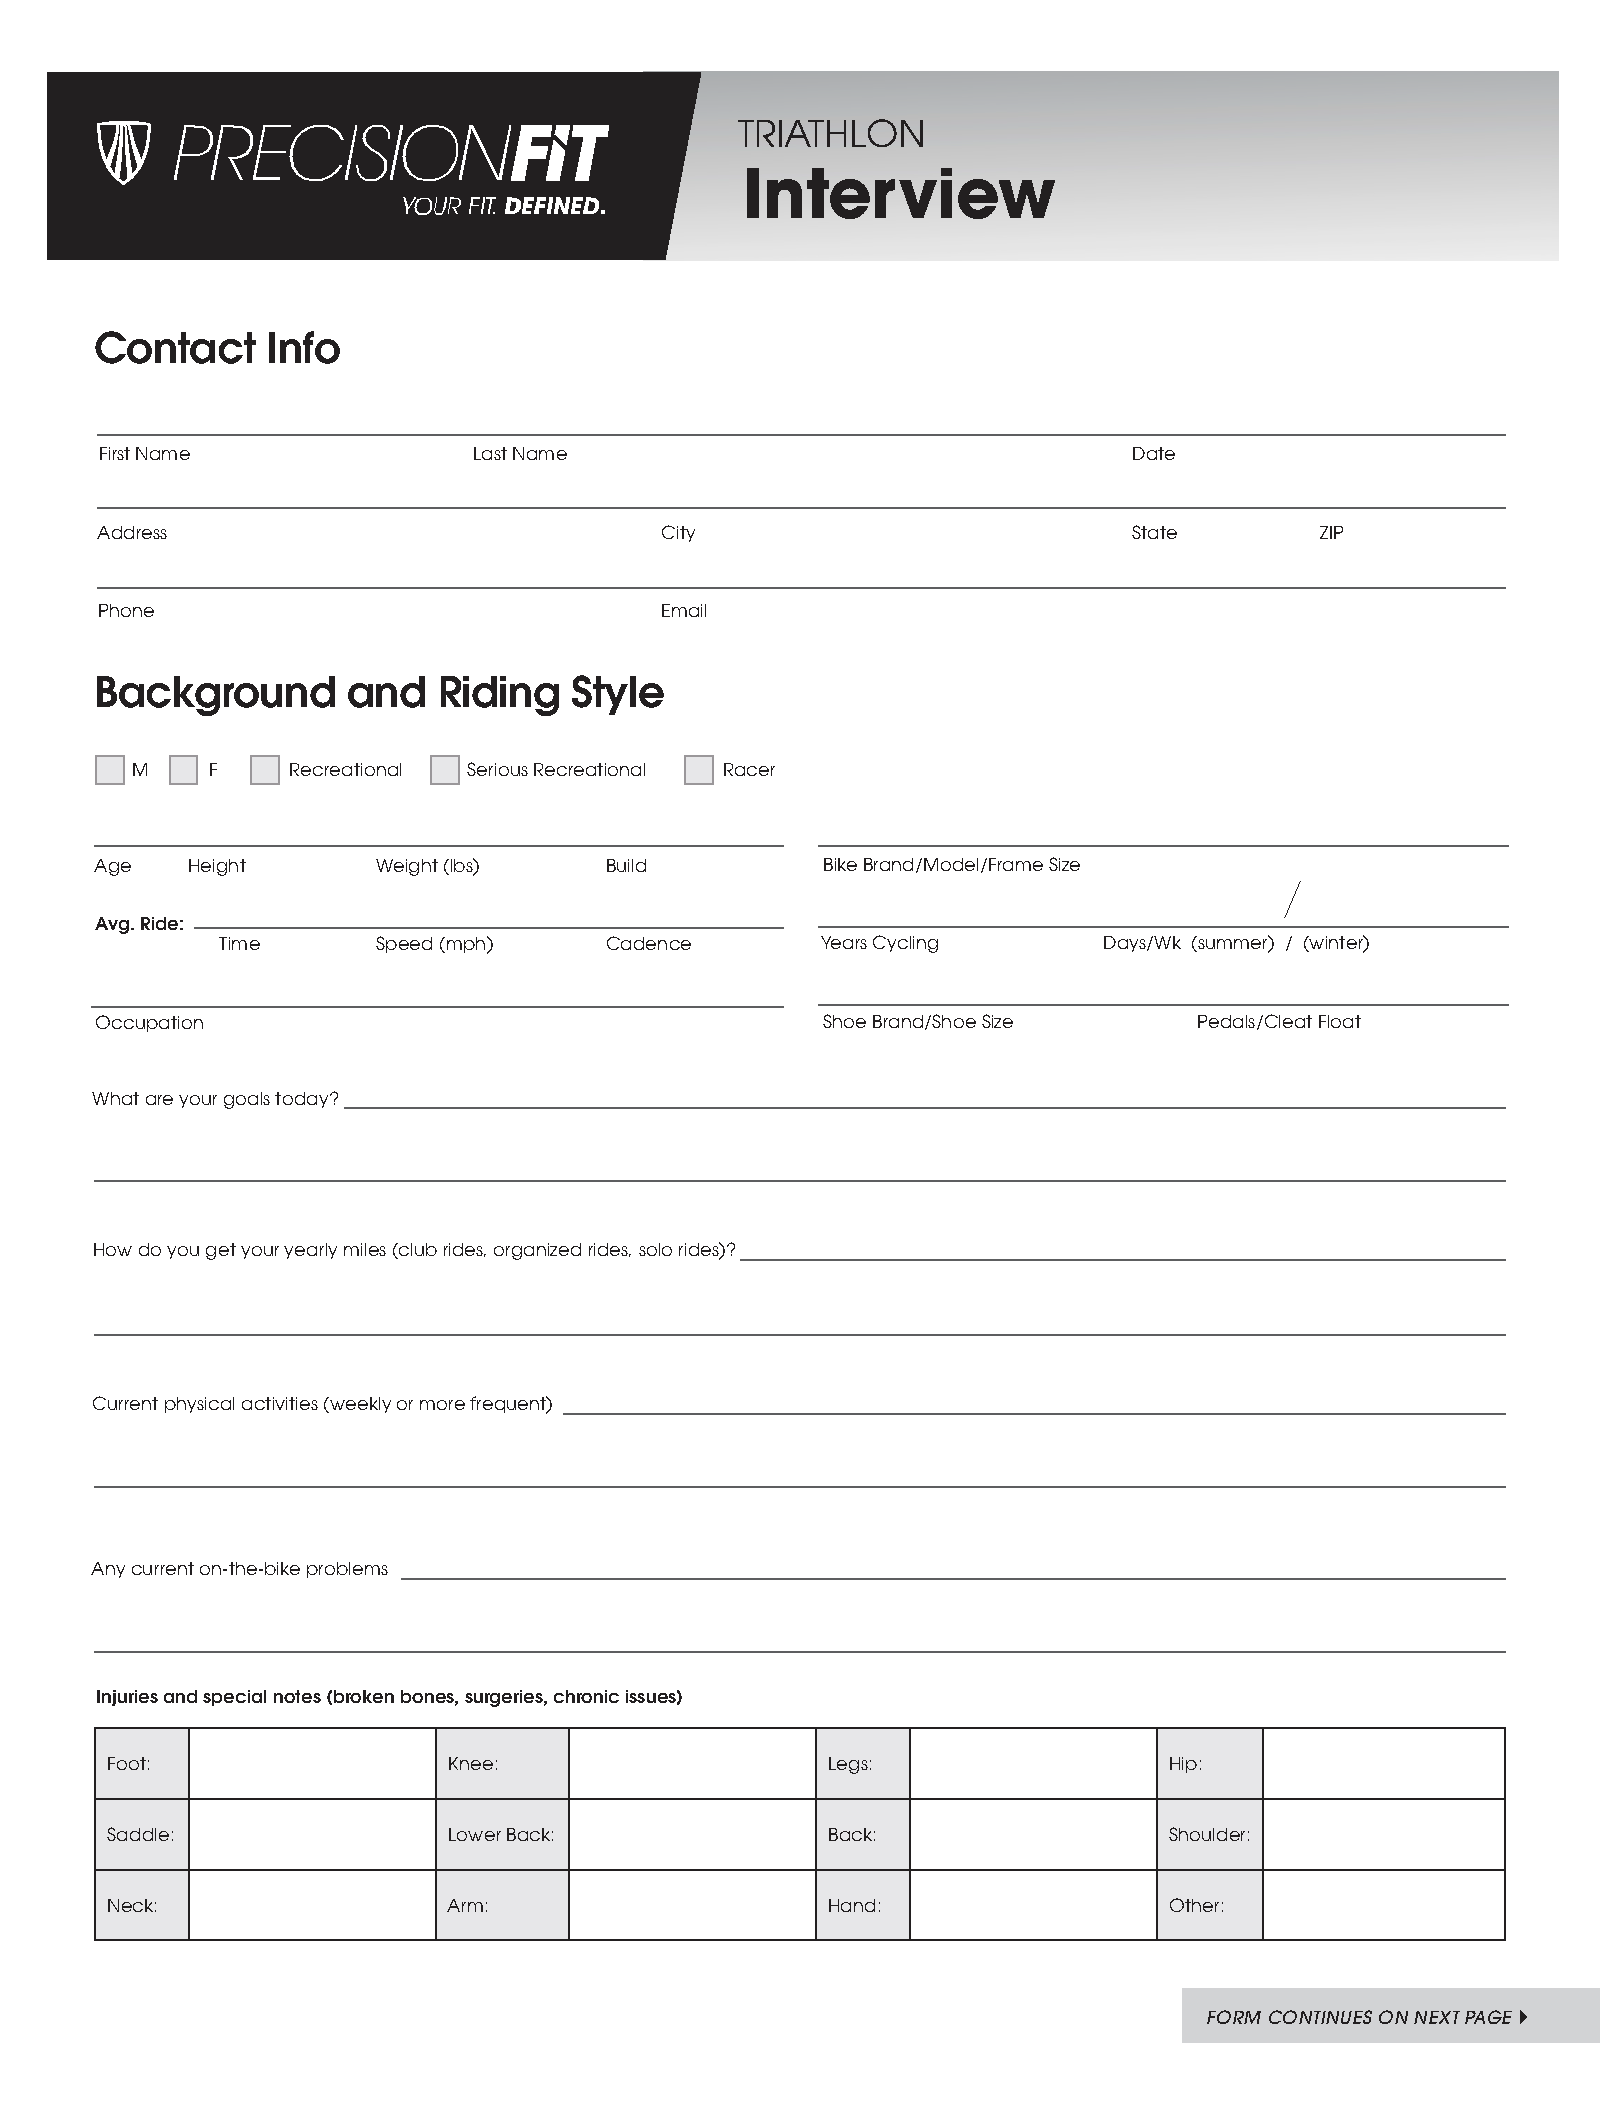
And now we move on to the most important part of the new bike process, the fit. But first, let’s back up for a minute. The most common question we get here at Aerogeeks usually sounds a lot like this, “I have an extra $200 to spend on my bike, what’s the best value?” Of course the amount of money may change, but the basic gist is the same. Everyone wants to know how to get the most bang for their buck in the speed department. We give the same answer every time—invest in a proper bike fit. So it should come as no surprise to any reader that the before we started taking our newest ride out on the road, we needed to get it fit to Mike.

When selecting a fitter, it goes without saying that you want to find a good one. And of course each fitter has his or her own style. Some prefer a more traditional fit done by hand, while others rely on computerized systems like Guru and Retul. In the same vein, depending on your own preferences and goals, some fitters will recommend a more aggressive fit, which may take some time to get used to. And others will set you up with a fit that will allow you to ride a century the next day. When choosing a fitter, reach out to other athletes in your local community and see who is doing fits that match your needs. For us, we tend to prefer a more hybrid approach – a computerized system to get you 90% of the way there, with the remaining 10% completed by eye and experience. We also look for a balanced approach to fit position. We want a fit that will allow us to go 50-100 miles in the aerobars comfortably, while still getting as low as possible. We know that sounds a little contradictory, but we’ll explain more about that later on.

In the case of many of today’s modern superbikes, you also want to consider if the shop you are going to be working with is familiar with your bike and will have the parts on hand to try different configurations. Bikes like the Speed Concept have a fully integrated front end, requiring bike-specific components to change the reach and height of the cockpit. Now that’s not to say you couldn’t get fit one place and then take that fit to a shop familiar with your bike. We simply prefer a shop that can do both, mainly because we may want to make small changes on the fly during the fit process. And let’s face it; it makes the entire process that much easier.
TriBikeRun
All things considered, we decided to complete Mike’s fit at TriBikeRun in Juno Beach, Florida. We chose TriBikeRun for a few reasons. First, they came highly recommended by Coach Tommy. Second, they use a hybrid-style fit approach, using both a computer and hands-on methods to get you dialed in. Finally, they carry Trek (along with Felt, Cervelo, and BMC), so we knew they were comfortable with the intricacies of the Speed Concept and could easily swap parts as needed.
![]()
Any triathlete is going to feel right at home walking into TriBikeRun. As you enter the shop, you have a full selection of running shoes on the right side and a wall of bikes on the left. Overhead is a pulley system to keep bikes out of the way (be sure to ask one of the store team members to show you how it works). Midway through the store is a section for swim gear along with one of the largest nutrition sections we have ever seen. In the back is the bike mechanics area and fit studio.

The fit studio also doubles as the Trek Project One build center to help you design your perfect Trek. Linda, the co-owner of TriBikeRun (along with her husband George), was deep into a custom build to replace her own Speed Concept when we arrived. We couldn’t help but provide some advice on color schemes, but we’re not sure if she appreciated that that the only colors we would recommend were lime green and blue. At least that seemed like the obvious choice to us.

While the shop caters to the triathlon community, they have plenty of mountain bikes and commuters. It’s easy to see where Linda and George’s hearts lie. This is a tri shop through and through, which is just another reason why we wanted to get fit there.

The Fit
Mike got his first surprise of the day just before his fit was about to start. Rudy, the head mechanic and fitter at TriBikeRun, pulled out a massage table. At first Mike hoped that somehow meant all fits start with a pre-fit massage, but really the time on the table was going to be just one part of the six-part Trek Precision Fit process.
The process starts with an interview to determine where you are as an athlete and where you want to go. There is a large difference between the fit you want for sprint distances (you’re on the bike for about 30 minutes) versus the fit you need to go a full 112 miles. Of course in both cases you’re always looking to stay aero for the entire ride, but we as athletes tend to be willing to suffer more over a shorter time period, thus allowing us to get much lower and more aero for a sprint distance event.
Part two is where the massage table comes into play. Once the interview is complete, it’s time for the physical assessment. The assessment checks your current body morphology across eight areas. Everything from your foot position to your stability is tested. There is nothing like having a tri coach cheer you on while doing a plank in front of an entire bike shop crowd! (Also, Mike felt it was important to let everyone know that, yes, he made it past the 60-second threshold).

As you can see in the images below, you are going to complete a number of tests for range of motion and flexibility. While we’ve been through plenty of fits, the Trek Precision Fit’s off-the-bike assessment definitely stands out.


Step three is shoe setup. When it comes to your shoes, a proper fit is about more than just cleat placement. It’s also about making sure the shoe properly fits your foot. This ended up being one of the most important parts of the entire fit process for Mike, leading to the addition of Giro X-Static insoles to his current shoes.

Next up was step four, setting up the fit bike (a licensed Purely Custom bike) with your current fit coordinates. For us this was a bit of a challenge since Mike’s primary test bike had been taken apart after the season as a number of product reviews ended and components were sent back. So instead, we based the initial setup on the guidance provided by the Trek Precision Fit.

Trek breaks up the fit into a lower-body and upper-body setup. The lower body starts with your saddle selection. One of the more interesting tests you do as part of the physical assessment is a sit bone test. A pressure-activated board is used to determine where your sit bones are. The image below gives you an indication of Mike’s sit bones (so yes, we just asked you to look at an impression of Mike’s butt). Once the sit bone width is determined, a saddle can be selected. Now it was time to determine the saddle’s position relative to the bottom bracket. The fit bike allowed Rudy to easily adjust the saddle height and location (though this had to be adjusted manually versus some fit systems that can be adjusted remotely by the computer).


The Trek Precision Fit system uses a 2D motion capture system to determine your current position versus what it sees as the optimal position. It was during this process that Mike discovered his initial position was causing his knees to bow out. The solution ended up being a small modification to the Giro X-Static insoles to help keep his knees parallel with the bike. While this was a small change, it provided immediate results. The cameras also helped to hone in on getting the saddle position just right in order to optimize Mike’s leg and knee angles.

Finally we were on to the upper-body setup. Here we determine the proper stem height and reach. And with a tri bike, you are also determining armrest width and position as well as extension length. For those buying their first tri bike, this is a great time to also try different extension shapes to see what you like best.

It was at this step that we ended up in a surprising position. Remember back to the beginning when we’d talked about comfort and speed depending on distance? Well, Rudy had set Mike up in a very ‘relaxed’ position. The cockpit height relative to the saddle was nowhere near as low as we had ridden previously. Yet Mike found the position to be extremely comfortable and, most importantly, the power meter attached to the fit bike showed this comfort was translating into increased power numbers – when the cockpit was lowered, so did the power. So we went with it. And then Rudy got to work building up our Speed Concept to match the coordinates.

Finally, he was done! So we put the Speed Concept on the trainer and … it wasn’t quite right. The Speed Concept offers extensions in multiple lengths, and we had purchased the long ergo extensions expecting that this would fit Mike’s needs. This is where going to a shop that knows your bike is so important. Rudy built up our bike with those extensions, and the minute we got them on the bike we realized that Mike needed to size down. Luckily the shop had the other extensions available in stock. So back on the stand the bike went. The Di2 cables were unplugged and the medium sized extensions went on.


After that, we put the bike back on the trainer and things finally felt right. We adjusted the saddle a touch, moved the extensions in a bit, and we were set. But, we have to be honest; the bike still just looks wrong. The saddle is too far back, the cockpit is too high, and yet when Mike got on, he was fast. And not just fast for a few miles, we’re talking fast for the entirety of the ride. Over the first few rides he has blown away his previous times on the bike (pre-fit) and been able to stay in the aero bars for far longer periods of time. We actually spoke to Coach Tommy about this since it just seemed so strange to us. Mike appears to be less aero, but the times don’t like—they say Mike is faster. The key here is that Mike is able to spend almost the entire ride in the bars. Previously, in a much more aggressive position, he would need to swap out to the pursuits on occasion.
Final Thoughts
A good fit is a thing of beauty. For a relatively inexpensive sum you can make the absolute most of the equipment you already own. A proper fit will set your body up to produce the most power possible on the bike while placing you in the optimal position, whether you need to hold it for 40k or 112 miles. While we still may give our new test bike some strange glances as we get used to its setup, we can’t deny the new position is already showing its benefits. Mike is faster on the bike, and his splits off the bike are setting PRs as well. Last week we did a 50 miler + 5K brick and Mike dropped over a minute off his best post-ride 5K, and this was the beginning of season—not in race shape. Sometimes it pays to listen to your own advice, and getting a proper bike fit is advice worth listening to. When it comes to the Trek Precision Fit, we were extremely satisfied – the combination of a 2D camera-based system combined with an expert fitter was exactly what we were looking for. Oh, and lest we forget, getting fit at a shop like TriBikeRun where they understand a triathlete’s needs makes it all the better. After all, when you’re looking to get the most out of your bike, you want to be at a place where the staff has already “been there and done that” and has the war stories to prove it.
Hello
How can i do, to get a ¨Precision Fit
I need it to my sport center in Venezuela.
Please help me
Best regards
Jose Abraham