In out last post we covered the BTA (between the arms) position for storing hydration on board the bike. As we discussed, we feel this is by far the best position to store hydration. However, there are a number of limitations with this position. First and foremost, you can only store one bottle in this position, and if you want to hold more, it would have to go somewhere else on the bike. Second, for a BTA solution you are required to have a set of aero bars (though Profile Design does sell the Aero Base Bar Bracket that could be used with a standard set of drop bars), which you may not yet have if you’re doing your first few triathlons (or you may be doing a race more suited for a road bike). For these situations, the second option AeroGeeks recommends is the rear hydration setup.
The rear hydration setup uses a mount attached to the seatpost or saddle from which one or two cages may be attached. The benefit of rear hydration is that the bottle(s) will be at least partially hidden behind the aerodynamic shadow of the cyclist’s body. This helps to minimize the aerodynamic penalties associated with carrying extra gear on the bike. An additional benefit of the rear hydration setup is that many of the solutions available also allow you to carry extra gear in addition to bottles, such as flat repair kits, in the same “shadow”.

Profile Design and XLab are probably the two most well-known manufacturers of this type of hydration solution, though there are many other manufacturers who make versions of this type of system as well. When purchasing a rear hydration system, you must first determine how many bottles you would like to carry behind you. Then you must determine if there is a need to carry a flat repair kit or other gear back there as well. For many riders, a single bottle system will be more than enough. But others may have the need to carry two bottles plus gear. To help determine what type of solution works best for you, refer to the first part of our hydration guide. One additional note—the price tag rises with the number of features, so this may end up being a deciding factor as well.
The Cage
Before diving into the options for carrying bottles it’s worth covering the cages used with these carriers. For example, some carriers will come with cages while others will ship alone. The most important factor when determining what cage to use with a rear mount is the cage’s ability to hold bottles over rough roads. Unlike frame mounted cages, rear cages often have a more vertical orientation making it far easier for a bottle to “launch”. Up to this point we have seen two basic takes on the rear mount cage.

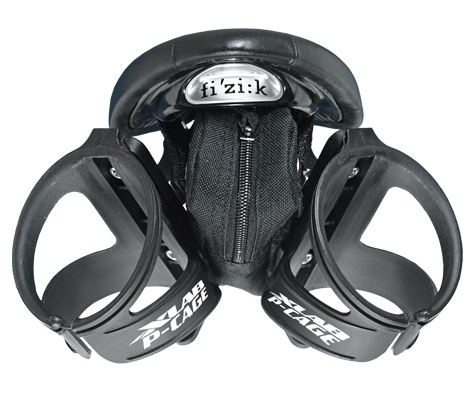
The first is the rubber banded cage made by both XLab (P-Cage) and Profile Design (Kage). These cages are essentially identical (and we at AG believe they are manufactured alongside each other). The trademark of this cage is a rubber band around the middle of the cage to help secure the bottle.
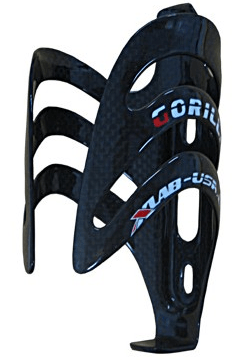
The other option is a carbon fiber cage designed from the outset with gripping in mind. Again, both XLabs and Profile Design make versions with PD’s Karbon Kage and XLab’s Gorilla. Unfortunately we have not yet had the opportunity to sample the Karbon Kage, but we are very familiar with the P-Cage, Kage, and Gorilla. From our experience, we hands down recommend the Gorilla for any rear facing applications. While both the Kage and Gorilla hold full bottles well, the Kage has a tendency to launch bottles when they are lighter (emptier). To date we have never had a Gorilla launch a bottle.
That being said, there is a price factor in this choice. While a Kage goes for $5 to $10, the Karbon Kage and Gorilla go for $50 to $60. However, regardless of price point, launching a bottle is a quick way to ensure that you will NOT be on the podium come the finish line (just ask Mirinda Carfrae at the 2012 World Championships when she lost her nutrition from a rear mounted Kage and ended up not having the energy needed for the last push of the race). Because of this we at AG only use Gorilla cages on the backs of our bikes.
Single Bottle

There are definite pros and cons to going with a single bottle setup. The advantages of the single bottle carrier are found in both weight (smaller and thus lighter) and aerodynamics (easier to hide a single bottle rather than two). The disadvantage is quite obvious in that you are only able to carry a single bottle, and there is also no place to carry an additional tool bag (which other systems are capable of carrying).
The simplest way to assemble a single bottle setup is to zip tie a cage to the back of your seat. This is by far the cheapest and easiest setup. In fact many pro riders have ended up going this route. Depending on your zip tying abilities, you may be able to set the cage at an angle and height most comfortable for you. Others however may find it easier to go with a solution from one of the major vendors.
XLabs makes an entire series of single bottle carriers, their Delta series. The Delta 100 and 200 are intended as non-frame specific rear single seat carriers (the 200 getting an upgraded cage over the 100). The 225, 300, and Sonic are intended for specific applications. Regardless of the model you go with, the feature set and its intended use are identical. The bottle is located behind your seat at an angle allowing you to easily access it without compromising aerodynamics.
Double Bottle
While there are many single bottle solutions available, there is an even larger selection of double bottle solutions. Manufacturers such as Tacx, Profile Design, and XLabs all offer different takes on the double bottle rear carrier. When choosing your solution you first want to examine what you will need in a carrier. Specifically, will you just be carrying bottles or spare gear as well?
The simplest solution comes from XLabs with their Mini Wing Kit. Each cage is connected to a single arm mounted to the saddle. XLabs sells the kit with a mini toolbag that you can squeeze between the cages. While the mini bag is unreachable in practical use (I found I could not access the contents of the bag with the arms tightened into position behind it), the arms work pretty well. The kit comes with P-Cages and is what one could consider an entry-level rear hydration kit.
The next step up is the concept of a single arm holding the two cages. Profile Designs RM1 and Tacx’s Saddle Clamp fall into these categories. These have the ability to place the bottles a little further out from the saddle, and in Tacx’s case, provide some adjustability to the orientation of the bottle. With some of these types of carriers you will see CO2 mounting options as well. However, unlike some other options, these types of carriers do not provide an easy option for carrying extra gear.

The final option when it comes to rear hydration is the most complex solution which is commonly referred to as a “wing” (regardless of the fact that Xlabs calls the mini wing a “wing” even though it’s technically just two non-connected bars). Wings are designed to give multiple mounting options and orientations as well as carry excess gear. While Profile Design makes a single version (the RMC), XLabs makes an entire series—entry level to the kitchen sink. The versions (Carbon, Turbo, and Super) are all plays on the same design with differences in excess storing capacity and weight. Personally, I have gone with the Turbo Wing. At only 15 grams more than the carbon wing it provides some additional orientation options as well as a much lower price point ($70 versus $150). The larger Super Wing does allow you to carry just about anything you could want on the bike (including multiple CO2s, tubes, and even tires) but you should probably ask yourself just how much stuff you need to carry.

Other Rear Hydration Options

While researching this post I came across an additional rear mounted option that I felt the need to at least share. The Never Reach Pro may look funny (or just plain wrong), but when you consider it from an analytical point of view you may recognize that it is essentially a combination of a BTA setup with rear hydration refills. It holds 64 oz. of liquid (the equivalent of 3 bottles) back behind the rider in the aerodynamic shadow with a long straw setup in the BTA position. In addition it is refillable on the fly. We here at AG look forward to a future opportunity to test this product and see if its versatility and usability overcome its look. Does function really trump form?
Wrapping Up Rear Hydration
While we here at AG recognize that BTA is by far the superior hydration option, we additionally recognize that many times only carrying a single bottle is not an option. For these instances, the rear hydration setups are the way to go. The combination of aerodynamics and practicality makes this position superior to the frame mounted options we will discuss in the next post of the series. The specific implementation of rear hydration for your bike will come down to personal needs and choice. We only hope that the information in this guide makes the decision easier.
Pingback: An Aero Wheel Primer | AeroGeeks·
check out Oasis One-Twelve, the ultimate hands-free hydration system. http://WWW.OasisOne-Twelve.com
It is definitely an interesting concept. I think the fact that it uses standard cages is one of it’s biggest attractions (along with the price – $40.95). The big concern however is that it is not refillable on the fly. 60oz may seem like a lot, but on a long distance course, many riders will be looking to pick up something extra. In addition being that it is a closed system, I think an option for insulated bottles could be a huge win. They also may want to consider some type of magnet for the bite valve so you could store it out of the way (similar to the setup the SHIV uses).
Pingback: AeroGeek’s Hydration Guide – An Introduction | AeroGeeks·
Pingback: AeroGeeks Awards | AeroGeeks·
I have the never reach…love it…wish there was an insulated wrap to keep liquids cold. Highly recommend!
Pingback: Kona 2013 – The Winning Rides | AeroGeeks·
Is the “never-reach”, USAT legal? regarding Sec 5.11 (e) in usat bicycle regulations. Also is the TorHans VR legal again with regards to the same rule? Thanks!!:)
I notice you didn’t review the PRO Aerofuel Tri Cage Saddle Mount on your review of rear hydration mounts. Any ideas of how it would stack up? Am I correct in assuming its a budget version of the X-Lab Super Wing?
Hi Jake – funny you should ask about hte PRO Aerofuel Tri Cage. We actually just received one from PRO yesterday afternoon. Stay tuned for our thoughts on it.